Raw Vegan Ice Cream Cones
Prep
2hrs
Total
24hrs
Servings
6
Ingredients
5
Level
Mod
Prep
2hrs
Total
24hrs
Servings
6
Ingredients
5
Level
Mod
Recipe by:Mariko Sakata
Raw Vegan Ice Cream Cones
Prep:2hrsTotal:24hrsServes:6
Ingredients
For preparing the kelp noodles
For the raw vegan ice cream cone
Directions
  1. In a large bowl, place the kelp noodles and pour in and submerge the kelp noodles with plenty of warm water.
  2. Add in a tablespoons of baking soda and mix it in well. Let it sit for a couple of hours until the noodles become soft and has a texture close to glass noodles.
  3. Rinse the kelp noodles well and drain.
  4. Add the young coconut meat, kelp noodles, maple syrup, vanilla extract, and salt into a blender and blend until it becomes a smooth but thick mixture. If you are using a Vitamix, use the tamper to help blend the thicker mixture. If you are using a regular blender and having trouble blending because of its thickness, add a little bit of water, but only the minimum amount you need to blend it smooth and no more! It should be a thick paste like mixture when you’re done blending.
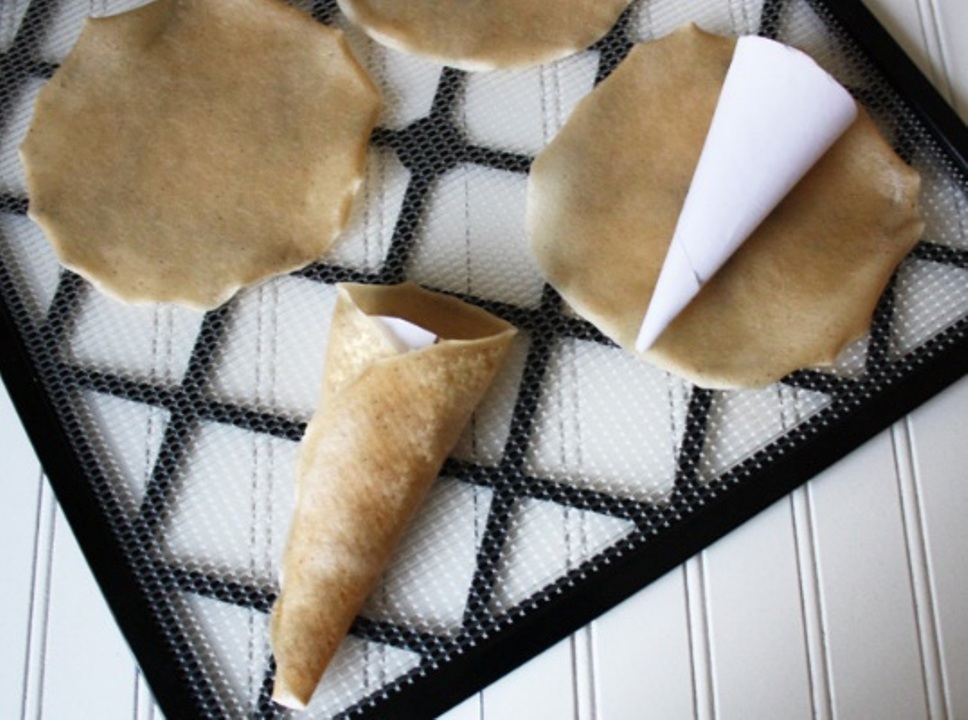
  5. On a dehydrator tray, lay down a mesh and a silicon sheet. Spread the mixture into the desired size you would like your ice cream cones to be, making the thickness about 1/4 inch thickness. My rounds were about 6 1/2 inches in diameter and with this size, the mixture makes 6 cones.
  6. Set aside about 1/8 cup of the mixture in the refrigerator to use as a glue later for the cones.
  7. Put the dehydrator trays in the dehydrator and dry at 115 degrees F for a couple of hours until the surface of the mixture dries and forms a skin.
  8. Once the surface is dry, remove the tray from the dehydrator and flip the sheet. To do so, place another mesh sheet, then another dehydrator tray on top and flip the trays upside down. Take off the dehydrator tray and the mesh sheet on top and peel off the silicon sheet.
  9. Stamp the surface using the mesh sheet to emulate a waffle cone texture. Press the mesh sheet on to the cone rounds firmly, then peel it off.
  10. Put the tray back in the and dry for another hour.
  11. Once the surface is fairly dry, flip the rounds upside down so that the textured side is on the bottom.
  12. Make paper cones by rolling the paper into cone shapes and taping it with a piece of scotch tape. Cut the excess paper at the top so it wills fit the dehydrator tray better. Make one paper cone for each round you have.
  13. Place the paper cone in the middle of the partially dried cone rounds and roll the sides up over it, into the shape of a cone. Take a small amount of wet mixture you saved in the fridge and use it as a glue to hold the sides in place. Stuff a small amount of the mixture at the end if there is an opening to seal the cone’s bottom.
  14. Dry in the dehydrator for about another 21 hours until the ice cream cones are completely crunchy and crispy. Make sure that when placing the cones that no paper gets close to the heating elements of the dehydrator!
Notes

Store in an airtight container. Keeps for one month.

Raw Vegan Ice Cream Cones