|
Recipe by:Amie Sue
|


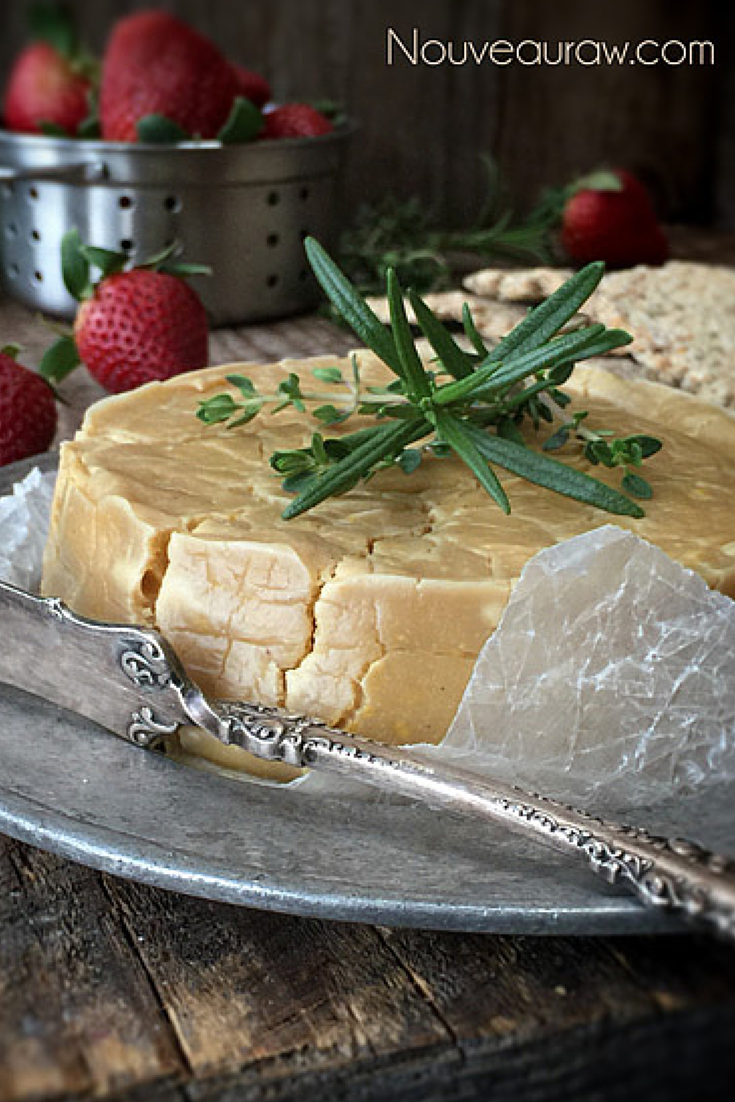
“Brie” Cashew Cheese Wheel with Rind
Prep:10minTotal:1hrServes:3
Ingredients

- 2cupscashews(raw, soaked for 2-4 hours)
- 1cupwater
- 1tspprobiotic powder
- 3tspnutritional yeast(optional)
- 1/2tspsea salt
| Directions |
|
- Place the cashews in bowl, adding twice the amount of water. During the soaking process, the cashews will absorb water and swell.
- After soaking the cashews, drain and discard the soak water. The process has a two-fold purpose: First, to soften the cashews so they blend perfectly smooth. Secondly, to reduce the phytic acid which is rough on digestion.
- In a high-powered blender, combine the cashews, water and probiotics. Blend until the mixture is velvety smooth. This can take 2-4 minutes, depending on your machine. Test it occasionally by rubbing the mixture between your forefinger and thumb. If you feel any grit, continue blending. Be careful that you don’t over-heat the mixture. If the carafe is feeling warm to the touch, let the mixture rest to cool before proceeding. If you have a low-powdered blender, I would suggest blending the water and the cashews first. Once smooth, then add the probiotic. We don’t want to kill the good bacteria by over-heating it.
- Prepare a stainless steel mesh strainer by placing it in a larger bowl. Then line it with a double layer of cheesecloth.
- Pour the “cheese” mixture into the center of the cloth.
- Gather all the edges of the cloth together, twist tight and fold it over onto itself.
- Lay a small plate on top of the bundle, followed by a weight. Use a mason jar filled with water, beans, flour or whatever. You want the weight to be heavy enough to put pressure on the “cheese” but not too much that it forces too much to leak through the cheesecloth. We have the bowl under the strainer to catch the “whey” that will slowly drip out. It won’t be much, just enough to leave a mess if unattended.
- Cover the bowl with a towel and set the mixture aside on the counter top for 24-48 hours to culture. The temperature of the house will affect the culturing time. The warmer the house, the quicker it will start to culture, so keep an eye on it. It will develop a pretty strong cheese-like odor during this time.
- After it has cultured, scoop the mixture into a clean bowl then add the salt and nutritional yeast. Mix well.
- Transfer the “cheese” to a ring mold or the ring of a Springform pan, lining the base with plastic.
- Place the mold in the freezer for several hours so it sets up nice and firm.
- Carefully remove the cheese from the mold and place on a non-stick sheet and slide into the dehydrator. Dry for 1 hour at 145 degrees (F). Click (here) to read why. Reduce the heat to 115 degrees (F) and continue to dry for up to 24 hours. Half way through the dry time, remove the teflex sheet and place the “cheese” on the mesh sheet for the remainder of the dry time. This will speed up the process and allow air to flow around it. This process will cause a rind to develop around the edges.
- Once done, enjoy! There should be a nice rind on the outside and creamy “cheese” on the inside.
- Store in an airtight container in the fridge for approximately 7 days. The “cheese” will continue to culture but once chilled it slows down considerably.
|
Ingredients
|
|
|
Directions
|
Notes